 Save to Pinterest
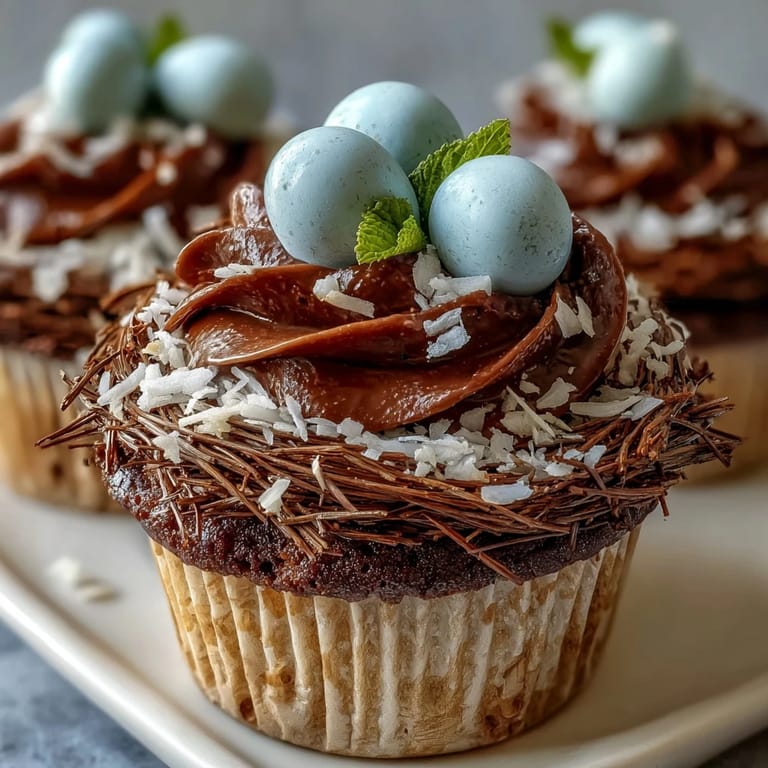
 You know that feeling when you open the oven and a wave of sweet chocolatey warmth greets you, promising good things to come? My apartment always fills with that irresistible scent whenever Easter Nest Cupcakes are baking and, somehow, this little ritual marks the unofficial start of spring for me more than any calendar ever could. No matter how many batches I've made, seeing the glossy, swirling nests take shape feels a little bit magical every time. Best of all, these cupcakes have forgivable steps—even if you're baking with little ones, or get smudges of buttercream everywhere like I do. They're a colorful excuse for giggles and a chance to make dessert feel a little playful again.
I remember making a double batch for my nephew's class party, set up in my tiny kitchen with a tangle of pastel liners and mini eggs rolling across the counter. We spent more time trading stories than focusing on perfect piping, and that laughter made the cupcakes taste even better. The joy wasn't just in the result, but in the merry mess and sticky fingers that led up to it. Somehow, decorating nests together made the work feel lighter—and the cupcakes disappeared minutes after the bell rang.
Ingredients
- All-purpose flour: Keeps the cupcakes tender—measure lightly with a spoon and level for best results.
- Unsweetened cocoa powder: Delivers deep chocolate flavor; sift it if you want the batter extra smooth.
- Granulated sugar: Sweetens the cupcake perfectly without making it too heavy.
- Baking powder and baking soda: Give the cupcakes a light, springy rise—don’t skip their partnership here.
- Salt: Balances the sweetness and perks up the chocolate.
- Eggs: Bind everything together and add richness—room temp eggs blend easiest.
- Whole milk: Adds moisture and creates a soft crumb; I once swapped with oat milk in a pinch and it worked fine.
- Vegetable oil: Keeps cupcakes moist for days—don’t let the batter sit long or it thickens.
- Vanilla extract: Adds that comforting bakery aroma; pure extract is worth the splurge if you have it.
- Hot water: Helps bloom the cocoa for extra richness—pour slowly so you don’t splash.
- Unsalted butter (for buttercream): Room temperature is best for easy mixing—set it out before you start baking.
- Powdered sugar: Gives the frosting its fluffy lift; it’s tempting to skip sifting, but your buttercream will thank you if you do.
- More cocoa powder: Intensifies the chocolate flavor in your buttercream—use the best you’ve got.
- Milk: Loosens up the buttercream until it’s perfectly pipable or spreadable.
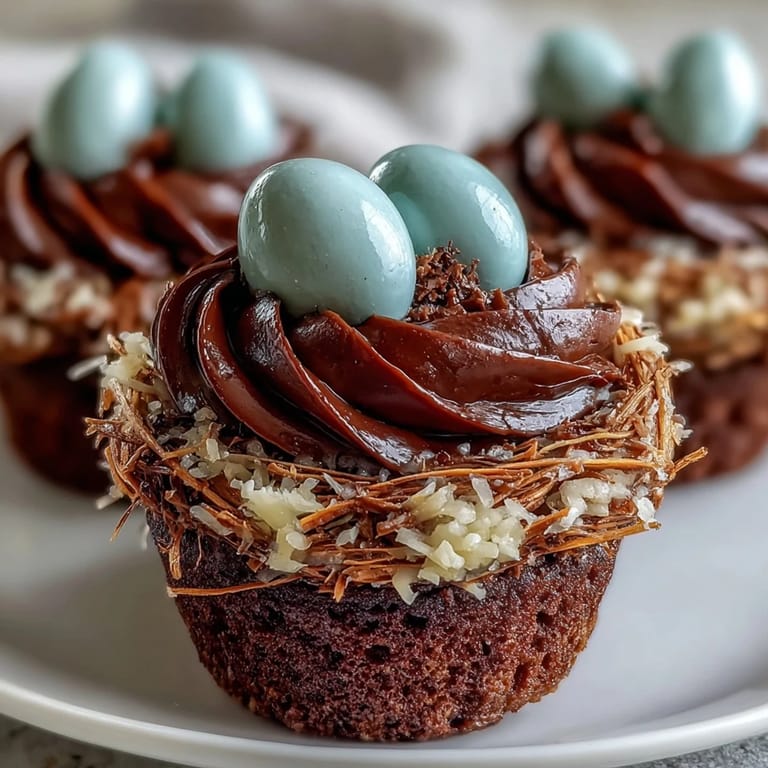
- Candy-coated mini chocolate eggs: The fun, festive finale—tuck in two or three for perfect nests.
- Shredded coconut or chocolate sprinkles (optional): Gives your nests that irresistible crispy look, especially if you toast the coconut lightly.
Tired of Takeout? 🥡
Get 10 meals you can make faster than delivery arrives. Seriously.
One email. No spam. Unsubscribe anytime.
Instructions
- Get ready and preheat:
- Heat your oven to 350°F (175°C) and line your muffin tin with bright cupcake liners so your nests have a festive home.
- Mix dry ingredients:
- In a large bowl, whisk together the flour, cocoa, sugar, baking powder, baking soda, and salt—the mixture gets that soft chocolaty smell instantly.
- Combine wet ingredients:
- In a second bowl, beat the eggs with milk, oil, and vanilla until silky and uniform; this is a good time to let kids take a turn whisking.
- Bring batter together:
- Pour the wet mix into the dry mixture, gently folding until just combined, then slowly add the hot water and keep stirring—the batter will look thin but that’s the secret to fluffiness.
- Bake the cupcakes:
- Divide the glossy batter evenly into your liners (it’s okay if you get a little messy), then bake for 18–20 minutes until a toothpick comes out clean and the tops spring back gently to touch.
- Cool and make buttercream:
- Let the cupcakes cool on a wire rack while you whip softened butter, powdered sugar, cocoa, milk, vanilla, and a pinch of salt until creamy and light—taste and add more cocoa or sugar if needed.
- Assemble the nests:
- Pipe or generously spread buttercream in a spiral, building up edges to mimic nest sides; don't fret about perfect lines, they look cutest with variation.
- Decorate the tops:
- Sprinkle coconut or sprinkles (if you want that twiggy nest look), then gently nestle two or three candy eggs in the center of each cupcake for a cheerful finish.
 Save to Pinterest
 On Easter morning, seeing my family’s eyes light up as trays of chocolate nests landed on the table is still one of my favorite little victories. These cupcakes end up being more than just dessert—they’re a centerpiece, a conversation starter, and somehow, a little symbol of the care poured into the day.
Troubleshooting Chocolate Batter
If your cupcake batter looks lumpy or grainy, give the dry ingredients an extra quick sift before mixing. Sometimes cocoa powder clumps sneak in, especially on rainy days, but gentle whisking is enough to sort things out. If you’re baking with kids, remind them it’s okay if the batter is thinner than expected—that’s what makes them so soft inside.
Customizing Your Nests
Once I tried swapping in toasted coconut for the nest and it brought the most wonderful, nutty aroma to the cupcakes. You can play with toppings—chocolate shavings, colorful sprinkles, or even little jelly beans if you’re in a creative mood. Sometimes, we make a few 'giant' nests with full-sized eggs just for fun and a bit of drama in the centerpiece.
Making It Ahead of Time
If you want to make your Easter morning less hectic, bake the cupcakes a day ahead and store them, unfrosted, in an airtight container—they’ll stay moist and ready to decorate. Whipping up the buttercream in advance also works, just give it a good stir before spreading to fluff it back up. On busy mornings, these little head starts make all the difference.
- If coconut is too strong for someone, just skip or swap with chocolate sprinkles.
- Remember to keep candy eggs away from little ones until the decorating stage—it helps prevent vanishing acts.
- Check cupcake doneness by touching the tops; they should bounce back, not leave a dent.
 Save to Pinterest
 Whether you’re making these for a family brunch or packing them up for a surprise delivery, Easter Nest Cupcakes bring smiles before the first bite. Enjoy making a bit of spring magic in your kitchen!
Recipe FAQs
- → How do I keep the cupcakes moist?
Do not overmix the batter; fold wet and dry ingredients until just combined. Stirring in hot water thins the batter and yields a tender crumb, and baking until a toothpick comes out clean prevents dryness.
- → What gives the nests their texture?
Shredded coconut toasted until golden or chocolate sprinkles create strand-like texture. Press them gently into the buttercream or sprinkle on top to mimic a natural nest.
- → Can I make these gluten-free?
Yes. Use a cup-for-cup gluten-free flour blend and check for binders like xanthan gum. Expect a slightly different crumb and adjust bake time as needed.
- → Which piping tip works best for nest shapes?
A medium round or open star tip works well. Pipe concentric circles, then pull up slightly to form a shallow bowl. Alternatively, spread the frosting and comb with a fork for a rustic effect.
- → How should I store the finished cupcakes?
Keep them in an airtight container at room temperature for up to 2 days, or refrigerate up to 5 days. Bring to room temperature before serving to soften the buttercream.
- → Are there easy dairy- and egg-free swaps?
Use plant-based milk and vegan butter for the buttercream, and replace eggs with a flax or chia mixture or a commercial egg replacer. Texture and rise may differ slightly.